

Generating images with AI is all about turning words into visuals. You use a platform like Glima AI, describe what you want to see in a text prompt, and the AI brings it to life. It handles everything—the subject, the artistic style, even the lighting—to create a completely unique, high-quality image from scratch in just a few seconds. Honestly, it changes the entire creative game.
Your Starting Point for AI Image Generation
Diving into AI image creation can feel a bit like learning a new skill, but the basic idea couldn't be simpler. You're just giving instructions to a creative partner that can visualise anything you can describe. This is a huge leap from the old ways, where you either needed serious artistic talent or had to trawl through stock photo sites hoping to find something that sort of worked.
Tools like Glima AI have made this technology incredibly straightforward. It's not just for tech wizards anymore; social media managers, marketers, and solo creators now have a seriously powerful tool in their arsenal. Think of Glima AI as your personal creative studio, rolling ideation, creation, and editing into one neat package.
The Modern Creative Workflow
At its core, the AI image generation process is a simple, three-part flow. It all starts with your idea. You then translate that concept into a descriptive text prompt, which the AI interprets and finally turns into a visual asset.
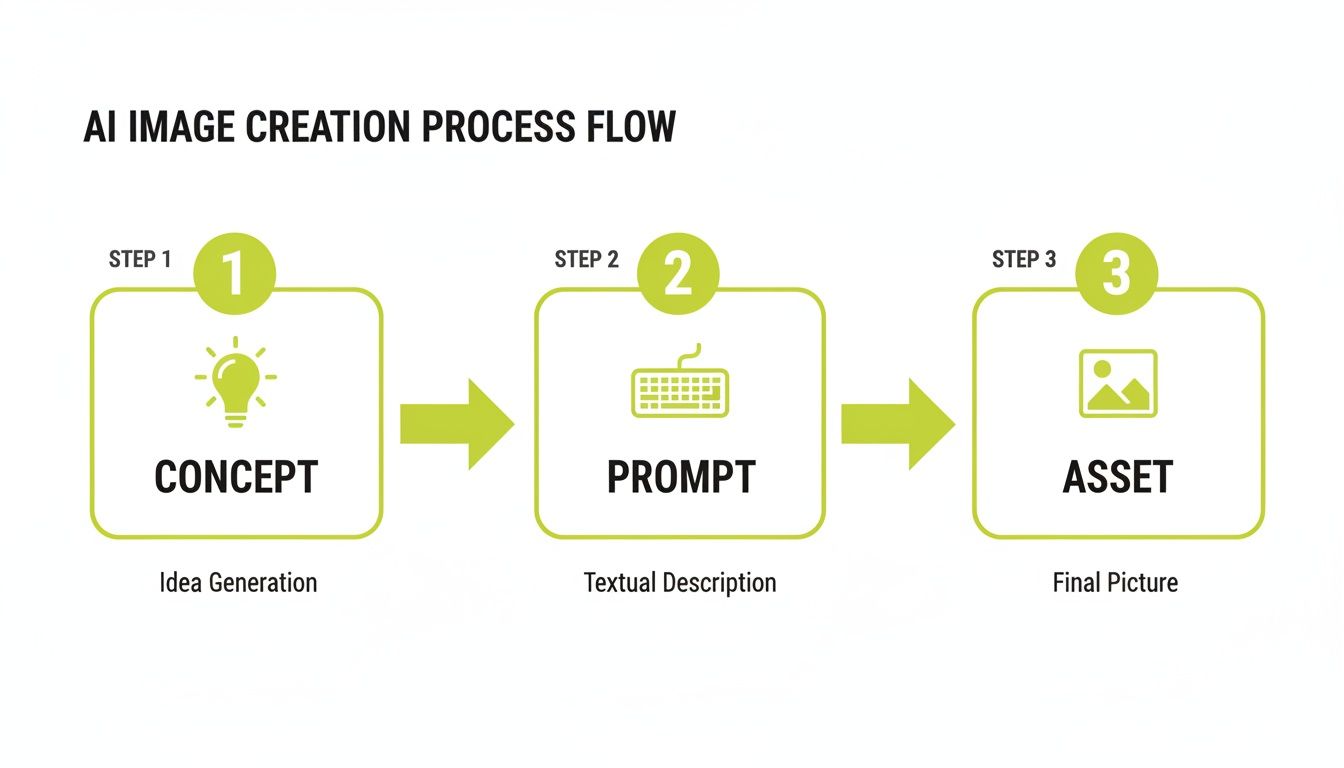
This workflow shrinks what used to take hours—or even days—into a few minutes, making it perfect for rapid prototyping and churning out content.
To better understand how Glima AI serves various creative needs, here's a quick breakdown of its features and their benefits for different types of users.
Glima AI Feature Overview for Different Creators
| Creator Role | Key Glima AI Feature | Primary Benefit |
|---|---|---|
| Marketer | Style Templates & Presets | Instantly create on-brand visuals for campaigns without design experience. |
| Social Media Manager | In-Editor Tools (Unblur, Upscale) | Quickly refine and perfect images for different platforms, ensuring high quality. |
| E-commerce Owner | Reference Image Generation | Produce consistent product mockups and lifestyle shots without a photoshoot. |
| Blogger/Content Creator | Text-to-Image Prompting | Generate unique featured images and in-article visuals that perfectly match content. |
This versatility is why so many different professionals are adopting these tools to streamline their work and boost their creative output.
Real-World Impact and Growing Accessibility
This technology is already making a huge difference. For e-commerce brands, it means creating gorgeous product mockups without booking a single photoshoot. For marketing teams, it’s about generating dozens of visual variations for A/B testing ad campaigns to find what clicks with their audience. To really elevate your content strategy, it's worth mastering dynamic image generation, a technique that pairs perfectly with AI's capabilities.
We're seeing this growth everywhere, especially in places like India, where the AI scene is exploding. The IndiaAI Mission has committed a massive USD 1.2 billion through 2029 to build up AI infrastructure, which is directly fuelling the rise of tools like Glima AI. In its market, the software behind text-to-image tools pulled in a dominant 86.31% revenue share, showing just how much demand there is for these creative solutions.
The real magic of AI image generators is how they open up creativity to everyone. A great idea is no longer held back by your skill with a camera or a paintbrush—only by your ability to describe it.
With tools built for practical, everyday use, anyone can bring professional-looking visuals to life. You can jump right in and see how Glima AI's text-to-image generator at https://glima.ai/create-image/text-to-image works. This guide will walk you through everything you need to know to turn your ideas into polished, compelling images.
Crafting Prompts That Bring Your Vision to Life
The quality of your AI-generated image hangs almost entirely on the quality of your prompt. You have to think of it less like a search query and more like a detailed creative brief you'd hand to a human artist. Tossing a simple phrase like "a dog" into the generator gives the AI far too much freedom, and you’ll likely get a generic, forgettable picture. The real secret to getting images that pop is mastering the art of detailed instruction.
Your goal here is to literally paint a picture with your words. You're guiding Glima AI toward the exact scene you have in your head, and that means going beyond basic nouns. A well-built prompt is the difference between something that looks like a cheesy stock photo and a piece of art that genuinely stops you in your tracks.
Deconstructing a Powerful Prompt
From my experience, the best prompts are built from several key ingredients. When you consciously include these elements, you’re taking control of the creative process and leaving very little to chance. Each piece you add gives the AI another layer of detail, sharpening its understanding of your idea.
Here are the essential building blocks I always try to include:
- Subject: This is your main focus. Be as specific as you can. Instead of "car," try "a vintage 1960s red convertible sports car." The more adjectives, the better.
- Action: What is the subject actually doing? An action brings the scene to life. Think "cruising along a coastal highway at sunset."
- Environment: Where is all this happening? Set the stage with rich details, like "a winding cliffside road, with turquoise ocean waves crashing against the rocks below."
- Lighting: This is a huge one for setting the mood. Specify the light source and its quality. Terms like "warm, golden hour light, casting long shadows" create a completely different vibe than "overcast, moody afternoon light."
- Artistic Style: How should the final image look and feel? This is where you define the whole aesthetic. I often use phrases like "hyperrealistic digital painting," "vintage film photograph, grainy texture," or "vibrant anime style."
- Camera Angle: You can even direct the virtual camera. Use photography terms like "low-angle shot, looking up at the car" or "drone shot, aerial view" to nail the perspective.
When you start weaving these elements together, a simple idea quickly transforms into a powerful command that the AI can execute with stunning precision.
A great prompt isn't just a description; it's a recipe. You are providing the AI with the exact ingredients and instructions needed to cook up the visual masterpiece you're imagining.
From Simple to Stunning: An Example
Let’s see how this works in a real-world scenario. Imagine you need a hero image for a blog post about the digital nomad lifestyle.
Your First thought might be:A person working on a laptop on a beach
This is far too vague. You’ll get a generic, uninspired picture because the AI has to guess everything—the person, the location, the mood. It’s a recipe for bland.
Now, let's inject those building blocks we just talked about.
A much better prompt:A woman in her late 20s with brown hair tied in a messy bun, wearing casual linen clothes, sitting at a rustic wooden desk on a white sand beach in the Maldives. Her laptop is open, and she is smiling, looking out at the calm, crystal-clear turquoise water. The scene is illuminated by soft, early morning light, creating a peaceful and inspiring atmosphere. The style should be a high-resolution, photorealistic image, captured with a shallow depth of field, blurring the palm trees in the background.
See the difference? This version gives Glima AI a complete blueprint, resulting in an image that is specific, emotionally engaging, and perfectly matched to your message.
The Power of Negative Prompts
Sometimes, what you don't want in an image is just as important as what you do. This is where negative prompts become your secret weapon. Think of them as filters that help you sidestep common AI glitches or remove elements that just don’t fit.
For instance, if you've ever generated an image with weird, poorly rendered hands or a blurry face, you can use negative prompts to tell the AI to avoid those flaws from the start.
Here are some common negative prompts I keep handy:
blurry, deformed, poorly drawn hands, extra fingersugly, tiling, poorly drawn face, out of frame, extra limbswatermark, signature, text, grainy, low resolution
By adding these exclusions, you're essentially cleaning up your image before it's even created, which can save a ton of editing time down the line. If you’re looking for more ideas, our guide on the Glima AI drawing prompt generator is a great place to find inspiration. This cycle of adding detail and filtering out flaws is the key to really mastering AI image creation.
Bringing Your Vision to Life with Styles and Reference Images
Once you’ve got a handle on writing detailed prompts, the next real leap forward is learning how to pick the right visual aesthetic. Your prompt is the blueprint, but the style is what gives the image its personality. That’s why the exact same prompt can give you a hyper-realistic photo, a quirky anime character, or a sharp 3D model, all depending on the style you select in Glima AI.
Think of styles as artistic shortcuts that immediately set the tone. A "whimsical watercolour" style could be perfect for a children's book, while a "sleek, photorealistic" finish is what you’d want for a product shot. We've built Glima AI's library with over 100 styles and templates to give you this exact control, no art school degree required. You can get a feel for the possibilities by browsing our full collection of Glima AI image styles.
Finding the Perfect Aesthetic
Choosing a style isn’t just about picking what looks nice—it’s a strategic choice. The right style makes sure your image communicates the right message. A vibrant "Pop Art" style screams fun and energy, which is great for a social media campaign. On the other hand, a "Cinematic" style adds a layer of drama and quality, ideal for a website's hero image.
Before hitting that generate button, I always ask myself a few quick questions:
- Who is this for? A corporate client will probably appreciate clean, modern styles more than the abstract, edgy visuals that a younger audience on Instagram might love.
- What's the vibe? Are you going for serious and professional, or something more lighthearted and creative? Your style choice is the fastest way to set that emotional tone.
- Where will it live? An image for a social media post needs to be bold and eye-catching to stop the scroll. A featured image for a technical blog post? That needs to be clean and illustrative.
The Real Power Move: Using Reference Images
While pre-set styles give you a massive head start, using your own reference images is the ultimate game-changer. This is where you can upload your own image—a quick sketch, a photo, a company logo, or even just a colour palette—and have the AI use it as a guide.
This technique is incredibly powerful for keeping your brand visuals consistent. Imagine uploading one of your existing brand assets as a reference; suddenly, every image you generate feels like it belongs to your brand. When you're ready to dive deeper, you'll find that techniques inspired by tools like Stable Diffusion's img2img feature open up a whole new world of transforming existing visuals.
Using a reference image gives the AI a visual anchor. It’s no longer just guessing based on text; it has a concrete example to work from. The results are far more controlled and much closer to what you had in your head.
The Glima AI editor makes this easy. You can upload and apply a reference with just a couple of clicks.
This screenshot shows just how many tools are at your fingertips in Glima AI. Notice how easy it is to access powerful features like reference images and a huge variety of artistic styles, all designed to make complex image generation feel simple.
A Practical Workflow for Image Referencing
Putting this into practice is surprisingly simple. Let's imagine you're a fashion brand and want to create a new ad using a photo of your latest handbag.
- Upload Your Reference: First, upload a clear, high-quality photo of the handbag.
- Describe the New Scene: Your prompt shouldn't describe the handbag itself—the AI already has the photo for that. Instead, describe the new world you want to place it in. Something like: "A model carrying the handbag while walking down a bustling, futuristic city street at night, with neon lights reflecting on the leather."
- Pick a Complementary Style: Choose a style that fits the new scene. "Cinematic" or "Hyperrealistic" would work well here.
- Generate and Adjust: Glima AI will use your photo to understand the bag's shape, colour, and texture, then render it into the new scene from your prompt. From there, you can tweak the prompt or try a different style until it’s perfect.
This approach is taking off, particularly in regions with major tech hubs. You can see how South India's lead in generative AI is changing how creators there produce visuals, with ecosystems in Bengaluru and Hyderabad leading the charge. E-commerce and media companies are all in, and influencers are even using techniques like multi-reference animation to create content that goes viral.
Refining Your Creations with Built-In Editing Tools
Getting that first image from your prompt is a brilliant starting point, but the real magic often happens in the edit. Think of the initial AI output as high-quality raw clay. Glima AI’s built-in editing suite is where you start sculpting, saving you the headache of exporting to a separate, complicated photo editor for those crucial final touches.
This all-in-one approach is a massive time-saver. Instead of bouncing between different apps, you can slide straight from generation to refinement without breaking your creative flow. It means your final assets are ready for anything, whether it's a high-resolution print ad or a sharp-looking social media post.
Upscaling for Professional Quality
One of the first things you'll probably want to do is upscale. Most AI models generate images at a standard web resolution. That's fine for a screen, but it won't work for print or any large digital display. This is where the Upscaler tool comes in, and it's a game-changer.
With a single click, it can boost your image resolution all the way up to 4K quality without making it fuzzy or pixelated. It uses smart algorithms to fill in the details and sharpen the lines, ensuring your final image is crystal clear. This is non-negotiable for anyone creating assets for marketing materials, client decks, or e-commerce listings where image quality is everything.
Sharpening Details with the Unblur Tool
Every now and then, an AI generation might look a bit soft or just lack that crisp focus you were hoping for. The Unblur tool is designed for exactly this. It's much smarter than a generic sharpening filter; it actually analyses the image to bring out the fine details that matter.
I find this incredibly handy for portraits or detailed product shots. If a model's face or the texture on a piece of clothing isn't quite popping, a quick run-through with the Unblur tool can make a world of difference. It adds a layer of professionalism that makes the image feel deliberate, not just like a raw AI output.
The best AI workflows don't just stop at generation—they pair it with intuitive editing. The goal isn't just to make an image, but to create the right image, and that almost always requires a few thoughtful tweaks.
Isolating Subjects for Versatile Use
For anyone in marketing or e-commerce, cutting a subject out from its background is a constant need. You might be creating product mockups or designing a clean social post, but you need a way to do it without spending ages tracing around the edges.
The Background Remover in Glima AI automates the whole thing.
- One-Click Removal: It instantly identifies the main subject and cleanly lifts it from its surroundings.
- Precise Edges: The AI is smart enough to handle tricky bits like hair or complex shapes, giving you a much cleaner cut-out than most basic tools.
- Creative Freedom: With the background gone, you can drop your subject onto a solid colour, a branded graphic, or even into a completely different AI-generated scene.
This one feature can easily replace dedicated software, making your workflow incredibly efficient when prepping images for different campaigns.
Removing Imperfections with the Magic Eraser
No AI is perfect. Sometimes, you'll get small, strange artefacts in your image—an odd object in the background or a minor flaw on your subject. For moments like these, the Magic Eraser is your best friend.
Just paint over the part you want to get rid of, and the AI intelligently fills in the blank space with a background that makes sense. It's a completely seamless way to clean up your visuals without leaving any obvious signs of editing. It’s perfect for tidying up an otherwise great shot to make sure your final image is flawless.
To give you a clearer picture, here’s a quick breakdown of how these tools fit into a typical creative workflow.
Glima AI Editing Tools Purpose and Use Case
| Editing Tool | Primary Function | Best For (Use Case) |
|---|---|---|
| Upscaler | Increases image resolution and clarity | Preparing web images for high-quality print or large digital displays. |
| Unblur | Sharpens soft-focus images and enhances fine details | Fixing slightly blurry portraits or adding crispness to product photography. |
| Background Remover | Automatically isolates the main subject from its background | Creating e-commerce product listings, social media graphics, or composites. |
| Magic Eraser | Removes unwanted objects or artefacts seamlessly | Cleaning up minor flaws or distracting elements in an otherwise perfect image. |
These tools give you the control to refine every pixel. If you want to take an even deeper dive, our complete guide to the Glima AI image editor explores all these powerful features in more detail, helping you transform a good AI image into a truly exceptional one.
Getting Past Common AI Image Problems
Even when you’ve written the perfect prompt, sometimes the AI will throw you a curveball. An image might come back looking… well, a little off. This isn’t a failure; it’s just part of the creative dance with AI.
Think of it like giving directions. If your AI partner gets lost, you don’t just repeat the same instructions louder. You rephrase, add a landmark, or clarify the destination. A few smart adjustments are usually all it takes to get back on track and smooth out your workflow.
Fixing Mangled Hands and Warped Faces
It’s one of AI’s most infamous quirks: generating anatomically… questionable hands and faces. You might get a six-fingered hand or an eye that’s slightly out of place. This happens because even after learning from millions of images, the AI can still struggle with the incredible complexity of human anatomy.
Thankfully, you have a few ways to fix this:
- Fight back with negative prompts. This is your first line of defence. Be explicit about what you don’t want by adding terms like
deformed hands, extra fingers, poorly drawn face, blurry featuresto your prompt. - Try a different seed. Sometimes, the random starting point (the “seed”) for an image is just unlucky. Simply generating the image again will use a new seed and can often fix the issue instantly.
- Deploy the Magic Eraser. For minor glitches, Glima AI’s Magic Eraser is a lifesaver. Just paint over the wonky area, and the AI will regenerate only that small section, usually with much better results.
When the AI Completely Misses the Point
Ever ask for one thing and get something totally different? This usually means your prompt was too vague, leaving the AI to guess what you meant. Clarity is everything.
For instance, a prompt for a “bat” could give you a flying mammal or a piece of sporting equipment. The AI doesn’t know which one you want without more context. The fix is to be more descriptive. Try a spooky nocturnal bat flying through a dark cave or a scuffed wooden baseball bat leaning against a brick wall. Your goal is to eliminate any doubt.
The AI doesn’t think like we do; it operates on patterns and associations. As a creator, your job is to build such a clear and strong set of associations in your prompt that the AI has no choice but to generate the image you’re imagining.
Optimising Your Images for Where They’ll Live
The stunning image you created for a website banner is probably way too big for an email newsletter. To ensure your creations look great and perform well everywhere, you need to optimise them for their final destination.
- For Web and Social Media: Before you upload anything, run your final JPEGs or PNGs through a compression tool. You want to shrink the file size as much as possible without sacrificing noticeable visual quality. This helps your website load faster and keeps your social media feeds snappy.
- For High-Resolution Print: If you’re designing a flyer, poster, or anything for print, always use the Upscaler in Glima AI first. This creates the high-resolution file you need to avoid any pixelated or blurry results when it comes off the press.
Keeping Your Creative Assets Organised
As you start generating more and more images, things can get messy fast. A little bit of organisation goes a long way toward keeping your projects efficient and your brand looking sharp.
I highly recommend saving your best prompts in a separate document. This builds a personal library of proven templates you can tweak and reuse later, which is fantastic for maintaining a consistent visual style. This isn’t just a good habit; it’s becoming standard practice.
In India, a remarkable 73% of businesses are now adopting generative AI tools, with 47% of them juggling multiple different uses. For designers, this shift means moving away from a patchwork of apps and consolidating into a single suite like Glima AI to produce brand-consistent artwork efficiently. You can learn more about these generative AI statistics and their business impact to see just how widespread this trend is becoming.
Got Questions? We’ve Got Answers.
When you’re getting started with AI image generation, it’s natural to have a few questions.## Got Questions? We’ve Got Answers
When you’re getting started with AI image generation, it’s natural to have a few questions. Getting from a basic idea to a polished, professional image involves a bit of a learning curve. Here are some of the most common things people ask when using Glima AI, along with some practical advice from my own experience.
Let’s clear up some of the common hurdles so you can focus on creating.
How Can I Make My AI Images Look Less… AI?
This is the big one. To get images that feel original and not like something you’ve seen a hundred times before, you have to get specific with your prompts. Forget “a cat on a chair.” Think like a director setting a scene.
Try something with more texture and mood: “a fluffy, ginger tabby cat with bright green eyes, curled up on a vintage, velvet wingback chair in a sunlit library, dust motes dancing in the light.” See the difference? That level of detail gives the AI a rich canvas to paint from.
Another game-changer is using Glima AI’s reference image feature. If you upload your own sketch, a photo with a colour palette you love, or a style example, you’re giving the AI a strong visual anchor. This is how you guide it toward your personal style or brand identity, ensuring the final image is genuinely yours.
What’s the Best Way to Fix Weird Hands or Faces?
Ah, the dreaded AI hands. We’ve all been there. Tackling anatomical weirdness is a two-step process: first, try to fix it at the generation stage, and second, use the editor.
Your first move should be to regenerate the image. Tweak your prompt slightly or just hit generate again for a new ‘seed’. It’s also incredibly effective to add negative prompts like ‘deformed hands, extra fingers, poorly drawn face’. This tells the AI exactly what to avoid.
If you’re still seeing problems, jump into the Glima AI editor. The ‘Magic Eraser’ is your best friend here. Just paint over the messed-up area, and the AI will intelligently regenerate only that selection—a technique called inpainting. Sometimes, for smaller glitches, simply using the ‘Unblur’ tool or upscaling to a higher resolution can sharpen the details enough to fix the issue.
The key is to think of it as an iterative process. You’re not just telling an AI what to do; you’re collaborating with it. Guide it with small tweaks until the image lines up with what’s in your head.
Can I Actually Use Glima AI for Commercial Projects?
Absolutely. Glima AI was built with professional and commercial work in mind. You can generate images that are more than ready for print ads, social media campaigns, and websites. The trick is to use the ‘Upscale’ feature, which can boost your images all the way to 4K quality. This ensures they stay sharp and professional, no matter where you use them.
The platform even has specialised workflows for e-commerce and marketing, with tools for creating product photoshoots, on-hand mockups, and even virtual try-ons. The main thing is to hold your AI work to the same standard as any other creative asset. Always give your final images a thorough quality check before they go live.
How Do I Keep a Consistent Style Across a Whole Bunch of Images?
Maintaining a consistent look is crucial for any brand or project. It’s totally achievable in Glima AI if you’re methodical about it.
Here’s a simple workflow I use:
- Save Your Golden Prompts: When a prompt nails your brand’s aesthetic, don’t lose it. Save it as a template. You can then reuse the core elements—like the lighting style, colour palette, or artistic medium—for future images.
- Pick Your Styles and Stick to Them: Don’t jump between dozens of styles. Choose one or a small, complementary set of styles from the Glima AI library and use them consistently across your entire project.
- Use a “Brand Anchor” Image: Find or create an image that perfectly represents your brand’s look and feel. Upload it as a ‘reference image’ for multiple generations. It will act as a constant visual guide for the AI.
- Create an Editing Checklist: This is a simple but powerful habit. Make a quick list of final touches—like a specific crop ratio or a slight contrast adjustment—and apply them to every image in your series using Glima AI’s editor.
Follow these steps, and you’ll be able to produce a whole set of visuals that look like they belong together, strengthening your brand’s identity.
Ready to turn your ideas into stunning visuals? With Glima AI, you get an all-in-one creative platform to generate and edit high-quality images and videos in seconds. Start creating for free today at https://glima.ai.